Create the Project
In this tutorial, you will create an Epicenter application that implements chat messaging between users.
The tutorial is based on a ready‑to‑go application template from the chat branch of the dev-base-build repo.
Learning path:
- Follow this guide to deploy and run the application.
- In the next guide, learn how to use the Chat adapter.
- Log in as a user to play the game.
Create a project
First, create an Epicenter project:
- Log in to Epicenter.
- Create a password-protected project by following the steps in the Team Projects guide.
When creating the project, note the Project ID, also known as the project short name. You will need it in the deployment step.
Update settings
To configure your project:
- Open the project settings page.
- On the settings page, expand Advanced Settings.
- Under Push Channel, select Enabled.
- Under Web Access, select Allow access to all URLs by default.
- Under Allow Channel Workshop Default, select Enabled.
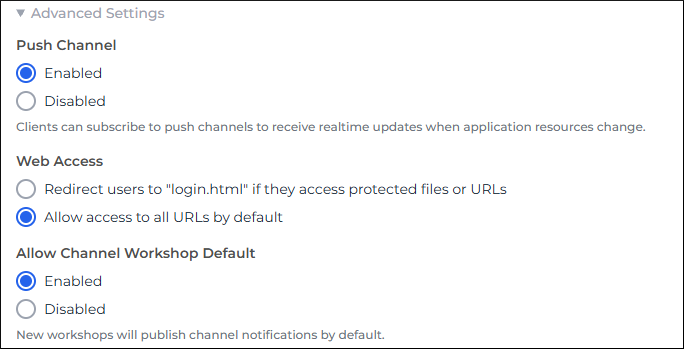
- At the bottom of the page, click Save Project Settings.
Update multiplayer settings
- At the top of the Settings page, click Multiplayer Settings.
- Under Multiplayer, select Enabled. The multiplayer settings pane expands.

- Add three roles with the following properties:
- Role Name: "Player 1"; Minimum: 1; Maximum: 1
- Role Name: "Player 2"; Minimum: 1; Maximum: 1
- Role Name: "Player 3"; Minimum: 1; Maximum: 1
- Under On the Multiplayer Assignments page, start with assignments belonging to the, select Most Recent Run Configuration.

- Click Save Multiplayer Settings.
Add users to your project
To allow people to use your Epicenter application, you create a workshop and add users to it.
- Create a workshop. For this project, you don't need to edit the optional workshop parameters.
- On the workshop page, follow these steps to add a user of type Facilitator.
- Repeat the steps to add as many users of type Participant as you need.
To learn about the Participant and Facilitator user types, read the admin guide on Users.
To test group and one-on-one chats, add three participants to your project.
Assign roles
In a multiplayer project, you must assign users to roles.
You will be prompted to create the first run configuration. Click + Create and Use.
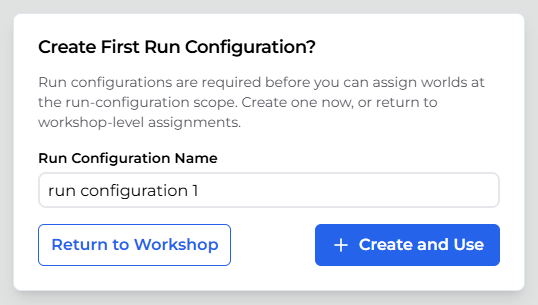
For this project, you can use the auto-assign functionality.
Set up the development environment
Now, let's clone the application template repository from the chat branch of the dev-base-build repo to a local folder.
In the steps below, replace my-project with a directory name of your choice.
In a local directory, run the following shell commands:
npx degit forio/dev-base-build#chat my-project: to clone thechatbranch to a local directory calledmy-project.cd my-project: to change to the new project directory.npm install: to install dependencies listed in\my-project\package.json.
Configure the environment
Now let's edit the variable values in the \my-project\.env file:
- To customize the application name displayed in the user interface, set the value of the
VITE_PROJECT_NAMEvariable. - To be able to run the application on your machine for development and local testing, set these variables:
VITE_DEV_ACCOUNT_SHORT_NAME- this value must match your account short name.VITE_DEV_PROJECT_SHORT_NAME- this should match your project short name, also known as the project ID which you noted when creating the project.VITE_DEV_API_HOST- the Epicenter API host for your server. Corresponds to theSERVERvalue in Deploy project files, but without thehttps://prefix.
The VITE_DEV_* variables in the .env file are required only for your app's local instance. When the application runs on Epicenter, the values are inferred from the project's URL.
Deploy Project Files
Deploy the model and the application UI to Epicenter.
- In the new project directory, run
npm run deployto deploy the files to an Epicenter server. - During the deployment, you must enter:
SERVER: The Epicenter server URL (defaults tohttps://forio.com).ACCOUNT_SHORT_NAME: Your organization's account short name. It is displayed on the organization settings page under Organization ID.PROJECT_SHORT_NAME: The project short name. This is the project ID from the project creation step.ADMIN_HANDLE: The email you used to log in when you created the project in the Epicenter UI.ADMIN_PASSWORD: Your Epicenter UI password.
These values are saved to \my-project\cli\config.json, which you can edit later.
Run the application
Now you can run the application locally or on the Epicenter server.
Local instance
To start the app in development mode:
- In the command line, go to your local
\my-projectfolder. - Run
npm run dev.
The application runs on http://localhost:8888/.
Run on Epicenter
To run your application on Epicenter:
- Open your project in Epicenter.
- Use one of these options to run the app:
- On the left, click Run Project.
- Click the project URL under the project name.
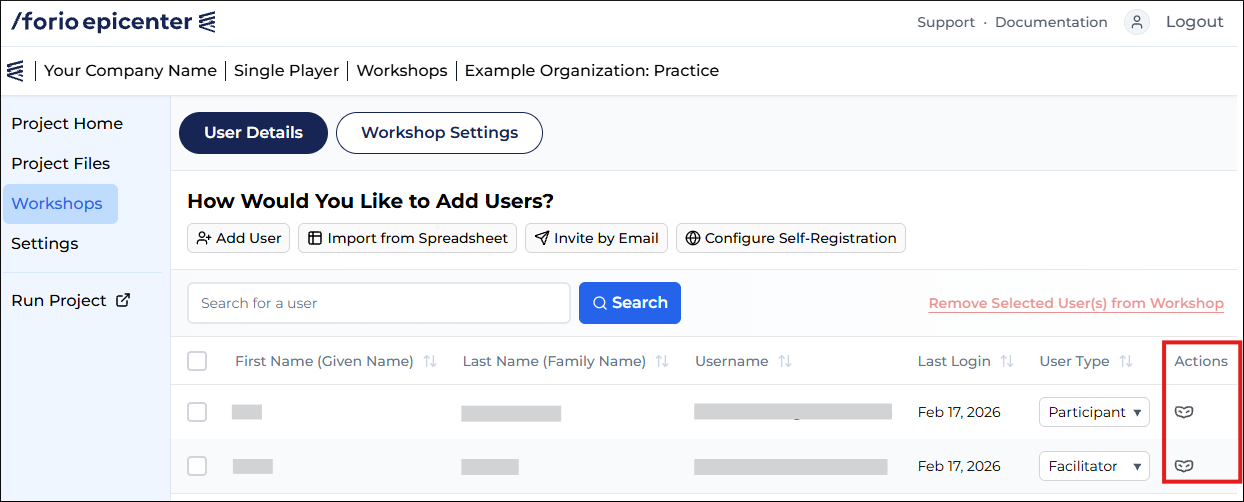
- Open a workshop and click the mask icon in the Actions column to log in as one of the users.
For example, here is a workshop in the single-player application with a Facilitator and a Participant: